
Water Tree - REMINDER

-
What you need!
-
Circuit Design
-
3D printing
-
Custom PCB
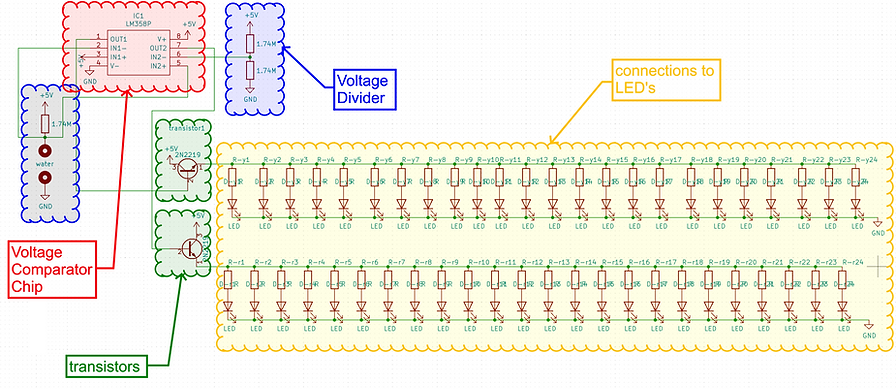
This circuit design uses the resistive properties of water to turn different sets of LED lights on and off. When the resistance from the water is matched with an equivalent resistance, the voltage potential between the two resistances is exactly half of the supply voltage. This is commonly called a Voltage Divider circuit and can be used to set voltage levels within a circuit.
I measured the resistance of my water source to be 1.75M ohms and connected the node between the water resistance and the matching resistance to a Voltage Comparison chip (LM358). The LM358 chip has two sets of inputs and outputs. By connecting the voltage divider node to each set of inputs, one set can be used to turn the lights (yellow) when the resistance from the water is present, and the other set can be used to turn the other set of lights (red) on when the resistance from the water is not present.
See below for the full circuit layout.

-
Soldering Iron/ Solder
-
SMD resistors
-
SMD LED's (yellow and red)
-
USB female power adapter, plug, and male to male cable.
-
Custom Printed PCB
-
Custom 3D printed enclosure
(download links and files for custom PCB and 3D print are at top of page)
This circuit uses a few simple components to tell you when your tree needs to be watered.
3D printing of the star topper enclosure and custom printing of the circuit board is the most expensive and time consuming aspect. But it's totally worth it because you can get creative and have a one of a kind star to share with your family. If you'd like to purchase my version for your tree, you can and I will build it for you!
Otherwise, enjoy the free build instructions and files.

If you are looking to get started with 3D printing, I'd recommend CREALITY ender 5. It is less than $400, has a large build plate, works really well with a glass build plate, and is big enough to do this 8"x8" star. Link below. Make sure you get the glass build plate. It sticks better.
Otherwise you can send the (.stl) file to a 3D printing company who will make it and send it to your door. But doing so typically cost around $25 per part, which can add up to the cost of a 3D printer, pretty quickly. This build is 2 parts. Alternatively you can purchase the build kit and I will ship the parts to you to build.
Custom PCB's, unlike 3D printed plastic parts, are much more affordable. around $5 dollars per board, depending on the size of board. The cut layer of this board can be modified using KiCAD, if you want to further customize.